Tuesday, October 6, 2009

Why Decorative Moldings?


Imagine wearing a well-made suit with a pair of sneakers, or a beautiful gown with ungroomed hair. This is exactly how I believe a home looks without moldings. The proper moldings give your home the beauty and grace it rightly deserves.

Depending on design, ceiling height, and other factors, there are a whole host of decorative moldings that can enhance the look and value of your investment, much more than you might realize. The right proportioned crown molding does wonders for a room's appearance, while the right sized baseboards compliment the crown and add to the total visual appearance. Sometimes a chair rail is just the right touch to complete and balance the appearance of a room. Bead boards also can be a major improvement. I have applied certain wood panels with trim inserts on walls, which give the appearance of recessed panels, the type you may have seen in those big old beautiful home built in the 1920s and 30s.

Well, there are many ways and techniques to spruce up a dull and boring room; above are just a few ideas. It is fun seeking and finding the right look just for your home, Once you do, and you see the fruits of your labor, you will always be happy with your decisions. Enjoy imagining and doing all you can do to bring your home, your castle, to its fullest potential.

I will provide pictures on my site of some finished products, before and after, so you can see and decide for yourself, what to do and how to proceed. Have fun!!!!!

Monday, June 29, 2009

Kitchen Cabinets Refinished!!!!


There was a time when whitewashing was the fad!!! As much as it hurt me as a carpenter and woodworker to see perfectly good natural wood covered with whitewashing, it was popular with many people. Pickling, as it is known, was also part of this trend. Well, as we all know trends come and go. Recently, I took on a refinishing project that entailed just that, removing the whitewash that had covered beautiful solid oak doors for years. The first thing I did was strip one door to ensure that quality wood was used. It was absolutely beautiful, so we proceeded to refinish the entire kitchen.

This was no small project, about thirty eight doors, and approximately eight drawer fronts. Then, all the face frames and side walls of the uppers and lowers had to be done. This is not a process to be rushed; however, if you are patient, it yields excellent results, as did this project. I will provide pictures (before and after) of this project, and you can decide if it was a worthwhile cause.

We are putting together a video, along with the clients of this project which will provide further insight. We restored the original hardware, which you will see in the pictures as well. This work is not for the faint of heart. It requires much patience, caring, and a knowledge of woodwork. However, fear not, you can do it. If you need help or have questions, e-mail or contact me through my website, and I will be glad to help. Happy refinishing!!!!!

Wednesday, May 13, 2009

Deck Building !!! Final Part!!


In earlier posts, I have given warnings pertaining to applications to avoid and not to cheat or stretch the limits. Well, back sometime in the 80's we built many decks, and as I have mentioned, many still stand to this day; others may have been removed for various reasons, but never due to lack of structure.

Well, one day, along comes the new guy on the block who proclaimed himself to be the Deck King. His prices where drastically lower than ours and, therefore, naturally received much attention. My partner at the time was quite upset with this new fellow and his unbelievable prices. I assured him that our prices were derived fairly and justly, all things being considered, and it would be just a matter of time till the reasons for this vast difference in price would surface. Well, needless to say our new competition managed to pull in quite a few projects we had quoted , which only further irritated my partner. I never changed my practices or lowered my standards to try to meet his.

Some time later, there was a very shocking article in the daily newspaper. It was about a family that was having some kind of celebration on their new deck, when suddenly the party moved from the air to the ground. Yes, there where some injuries; thankfully, none serious. This is a true story, and I'm telling you because you don't want you to fall prey to something similar.

Now that you know what a good job should be like, make sure you get your project done right the first time. Rule Number 1 is don't cheat; Number 2, don't stretch the limits of your components. In other words, use the timbers for the purposes they where designed to perform. And finally, maintain your investment. Nothing takes care of itself. It's up to you.

Happy Decking.

Tuesday, May 12, 2009

Deck Building!!! part 4!!

This will be a quick overview on stair building. Choose the location that suits your best use. Use 2"x12"s for the stringers, measure the distance from the deck's surface to ground level, and don't forget to allow space if you're going to use a concrete pad or pavers, for example. Now, divide that total dimension by 7 inches. Play with that number, if need be, keeping all steps the same rise distance; don't exceed 7.25" total rise. The rise is the distance from one step to the next. The tread is the step itself. This should be approx 11 inches, so a 2"x12" will serve perfectly to use for your treads. Use a framing square to mark each vertical rise and each horizontal tread.

As you draw these out onto your stringer, you will see each step, and exactly where it will be positioned. Follow your pattern down from top to bottom, to the last step. Use the fastening devise of your choice to place under each tread as support. Also, screw the treads from the outside of the stringers into each tread center. You should have three to four screws in each tread on each side.

Well, I hope this helps you. Don't get frustrated. Even so-called seasoned carpenters have difficulty with stairs, so learn as you go. Contact me, if you need to, or hire me to do any part or all of your deck. Remember, steps are something that people have a built-in feel for, so they will feel comfortable and easy to go up and down when they're right. When they're not , they can be clumsy and/or dangerous. This is not something you want, ever. Also, REMEMBER to make a gate if you have small children, one that can be secured when closed. The gate should be light, but strong and easy to operate.

Well, hopefully, you have a deck now, so stain it or preserve it. I don't suggest painting it; however, if you must, don't paint the undersides of the decking, as this will cause wood rot in a short period of time. The reason is that water passes through the wood too slowly because the paint is not porous enough, trapping water inside the deck boards, and never completely drying out. Avoid painting if you can. In the next segment, I will talk about and illustrate what not to do when building your deck. I will tell of some real-life experiences to illustrate these points.

Well, enjoy your new deck, and maintain it yearly, and you should be able to enjoy it for years to come.

Monday, May 11, 2009

Deck Building!!! Part 3!!

The hope is by now you're ready to begin work. First and foremost, you must secure the main box plate to the existing structure. If it is wood, locate the beam centers or the main box plate that your walls rest upon. Secure this plate using lag bolts, or through-bolts if your home is built of block. There are many of them out there that I passed through solid cement, sometimes twelve inches in depth, and then used threaded rods to secure this plate. Remember, the deck will be secured to your home only as well as you secure this vital plate!!

A good tip to remember is that every board has a crown to it; this is a raised section that can be seen when the board is held on edge and you look straight down the length of the timber. Crowns are always up when placing floor joists; mark them clearly so you don't face any timbers with the crown facing down. I always liked to use a colored keel, which is like a big crayon, but is unmistakably identified. Remember to place your floor joists 16" on center. Use a framing square to square up your frame and take your time placing all your beams, making sure you're square and level, and that you have parallel spacing between each floor joist. Now determine where your support members will go. These will reduce span and keep your dimensioned lumber within the codes. Don't cheat or stretch the spacing of these support members; they are what will be holding up your deck and its bearing load.

Once you have placed these members, you can determine where your support posts will be located. Again, don't cheat or stretch the span. More is better here. You may be asking yourself, how is all this lumber staying up while I get my support members and support post in place? By now you will have realized that you must temporarily support your entire framework until this process is in place. Once again, don't skimp on temporary supports; they will be keeping your deck square and level till you get your permanent support posts placed. You will want to keep them in place until the cement dries on your footings, so take care to place them where they will do the most good, yet not be in the way of the building process. During this time you will learn to appreciate the convenience of using screws for assembly.

Once you get all these components in place, you're ready for decking the top surface of your floor joists. These timbers are very important, as they will be highly visible. When I was building decks years ago, I would go to the lumber yard and pick each and every board to be used. Although some were not fond of this practice, I explained to them that I didn't mind at all paying full price for the lumber to be used; my goal was to ensure it was usable. So, I found it much more effective to select each piece. Although it took time to do this, in the long run it saved time and headaches. Till this day when I build a deck, I employ this practice. It also would be wise to use #1 lumber, as it has very few knots, if any.

When placing the decking down, you will find that most wood has either a cup or a crown, a cup being a curve inward, a crown being upward. Always face the best side up, whether cupped or crowned. Industry standards have found this to be the best application, despite years of theory to place the bark side up. When you take a photo of someone, you may hear them say, "Shoot my good side." That's because, for whatever reason, they appear more attractive on this side. This is the same with your decking. Let the best side prevail.

You will need to construct your railing system; that is, the supports for the railing system, before you place down your decking. The reason is that they will go down below your deck surface into the box plates, which will provide additional and necessary support. I like to through-bolt these supports, as this provides excellent strength for safety and stability. There are many styles of railings to choose from. Pick one that complements the existing architecture of your home, as this will make your deck appear as though it belongs to the home, and not as an added-on eye sore. Many people don't respect this part. Don't fall into that snare. Take time to consider, look at photos of sample railings, or simply try some real live samples and see what works. Now install them.

Just when you thought the fun was over, there's more. Do you need stairs? Where should you place the steps? How should they be constructed? We will learn more about how to build a deck that will last in the next blog. To be continued...

Deck Building!!! Part2!!

We have discussed certain elements of building your deck; now, let's look further. How large is your deck going to be? How high off the grade will it be? Will you be enclosing it at some time in the future? How many levels do you want, and shapes? All these questions need to be answered before you get started with your project. I, for one, have never built a deck that wouldn't pass the building codes or surpass their requirements. The reason is simple: Do it right the first time.

The size of your deck will determine lumber dimension to be used on floor joists, while the height can determine the difference between using wood support posts versus steel columns, and their size as well. You also will be able to determine how many support members it will take to keep the spans within code. Every deck I have ever built could withstand any future weight capacity that the structure would allow, and then some. By building this way, one could later enclose their open deck to a screened room, or even a room to be used all year round as living space. Many of my projects where later enclosed and utilized this way. Later, I will give you an example of why it is of critical importance to build this way.

You must consider snow loads (if you live in an area where it snows) and an allowance to step your deck down, so that when you do get a snow storm, the melted water does not enter your home through seepage. This has a simple, but necessary remedy known simply as a step down. I made it a habit to place the floor joists on 16" centers and still do this application to this day. True, it takes a few more joists, work, and a lot more deck screws to fasten the decking down; however, this is money you will never regret spending. It is the difference between enjoying your deck for years to come, and replacing it shortly after it has been built -- sometimes even worse, which we will learn about later.

Years ago, I used only hot-dipped galvanized nails to secure all the components, whereas today I use coated exterior deck screws for the entire assembly process. There is no comparing the fastening ability of a nail to a screw. It would be like comparing holding down a board with your hand versus clamping it down. Another great advantage to using screws is that it makes it very easy to change a board's location or appearance without damaging the materials. So, again, there is an extra expense in using a screw over a nail, however, the benefits far outweigh the costs.

Like everything in life, there is a way to approach things so that what we do is decent and in order, and mostly a blessing to all involved. My Dad used to say, "Don't be penny wise and dollar foolish." This is great advice. Don't compromise on certain things that are critical to your success; rather, be patient and wait till you can do it the right way. If you plan it out, it will happen, and you will be able to look back at what you did and say I'm sure glad I made the choices I did. Well, there's more, a lot more.

I bet you where thinking, how hard could it be to build a simple deck? And you are right; it is not very hard at all. The hard part is doing it right the first time!!! We will learn more of what to do, and what NOT to do, in the next blog.

Building A Deck!!!!! Part 1


Whether you choose to build a deck here in Florida, or in New York, or in California, there are certain basic considerations you will want to explore. Let us begin with the type of lumber to use. Today there are many choices: pressure treated lumber is one, then there are redwood, cedar, composite lumber, Douglas fir, and more. Depending on your specific location, your choice is important for various reasons, such as availability of the product itself, how it will hold up to the environmental conditions of your area, and how big your budget is to execute your project. Once you examine all these variables and are satisfied with your research, you may begin the planning process.

Now, let's take a project that will be done in New York. Consider the extreme changes in weather from summer to winter. From really hot days to freezing cold days. How will this effect the components I'm choosing for my deck? Years back, before pressure treated lumber, I built many decks in the New York area, some of which are still functioning to this day. This goes back some 25 years or so. How they were maintained over the years is a direct determination of their present condition.

In that geographical area it is necessary to dig down below the frost line, which could be as deep as 42 inches. (Most times it is 36 inches.) The reason for this is to prevent heaving, which simply stated is what happens when ice or frost gets below a footing. As it expands from below the footing, it raises it upward with great force and determination. One would find it hard to believe the damage heaving could cause if it has not been experienced personally. So, this is a critical factor in deck building in that region. No matter how good the quality of lumber chosen, or even the workmanship, if careful consideration is not given to this fundamental aspect of your project, the only hope you could have is that you have a fireplace, because that is where you will be burning the remains of your deck, providing you did not use pressure treated lumber, which should NEVER be burned.

Well, this is a start... We will see other important factors to be considered, as well as learning more about how to prevent the devastation caused by heaving. Tune in again for the continuation of this subject of deck building.

Sunday, March 15, 2009

The Claremont House Part 2 !!

Before we moved to the exterior of this wonderful home, we had to make sure all the windows were operable! I never counted just how many there where in total, but there were many, and in those days, some of them where the size of today's doors. To give you an example of how times have changed with respect to workmanship and maintenance, each window unit had removable window stops. They were held in place with brass screws and washers, so when it came time to service the sashes, there was easy access. In those days the window sashes operated by counter balance weights, each being unique to the size and weight of the upper and lower sections. These weights where hung by either chain or rope; many times the chains where copper. So, we serviced each and every unit so we could enjoy the fresh air when needed. Another great feature was that each sash had an individual number making it really easy to identify.

Well, now we go to the exterior. First, a new roof, new siding on both sides and the rear, also the upper three dormers. We decided to stucco the front giving the front of this home a real crisp and classy look. We had to knock down the garage. (This is very difficult for me to say, but it was too far gone.) All of it's structural integrity had given way to years of neglect. We landscaped and planted new shrubbery, added a fence, and built a huge retaining wall at the rear property line. Now, we could sit back and enjoy the fruits of our labor. A beautiful home with a nice income each month. We picked our tenants carefully and were blessed because of that. We always treated them with respect and consideration, and they did the same for us. Yours, Till the Next Rehab!!!!

Saturday, March 14, 2009

The Claremont House!!! Part 1

This was a massive home, 4.500 square feet, three floors in height, not counting the full basement. The home was built in the 1920's. Somewhere along the line it became a Nursing Home. We stumbled upon this home and immediately realized it's value. We bought this 15-room Nursing Home at a great price. The plan was to return it back to a residence, and to make rental units in the upper floors. This house needed everything. We gutted all the interior walls, which were plaster with wood lathe. As I recall, we filled about twelve 40-yard containers with all the debris from this project. We completely re-wired this home, all three floors. We turned a hallway window on one side of the home to an entrance leading to the upper levels. It was the perfect location because there was a set of stairs to the upper floors directly behind the window, so all we had to do was add outside steps going down from the new entry.

Every piece of woodwork on the first level was oak. Back then, painting over wood was very popular, so all this beautiful wood was covered with a horrible green paint. After many gallons of industrial strength paint remover and endless man hours, all the beauty was unveiled. The transformation was incredible! The beamed ceiling, the fireplace, the turned staircase -- all were golden oak. This staircase to the second level was too beautiful to give up, and not practical for the tenants to use, so we lined the staircase walls with an antique clock collection and created a library in the nook where the staircase turned to continue to the second floor.

The huge full basement housed the heating unit, a humongous commercial dryer left by the Nursing Home, and tons of extra extra room. The really cool part of this home was that there was literally plumbing set up in every room, which made it a snap to set the rental units up with both kitchens and baths. The first floor had solid white oak floors; unfortunately, before we could enjoy them, we had to remove the three layers of asbestos floor tiles that covered them over the years. The blessing was, that although it was brutal labor-wise to remove these tiles, they had kept the floor in great shape, and they were perfect after sanding, staining, and finishing where completed. Each day and every day, we worked hard and long to restore this old giant. To Be Continued!

Friday, March 13, 2009

1823 Landmark part 3!!!


After the necessary structural work was done, we decided to increase the square footage by adding a family room with a free-standing fire place. This was a great addition for the winter months and holidays. We made the ceiling cathedral style and added two skylights. This room also carried out the wood look that we enjoyed. We completely refurbished the exterior, from new siding to fancy cut cedar wood shingles on the cable ends. We found two old antique carved columns that we utilized at the front porch entry. We installed a real cobblestone walk from the driveway to the entry. As work on the house came to a completion, we turned our attention to the barn, installing a new electrical system, as we planned to convert the barn into living space at a future date. Outside, I made a real heavy duty club house/swing set for the children, which they totally enjoyed along with their friends. I found a genuine antique oak pool table at a tag sale, which I completely restored, and it found its home in the upper level of the barn. This provided many enjoyable times for friends and guests, as well as myself. Of all the homes I have restored, this was one of the smallest; however, it posed some of the biggest challenges and, yet, some of the greatest rewards. Till the next reno!! ''Reface, don't replace."

Thursday, March 12, 2009

1823 Landmark Part 2!!


Now that I had direction as to how to remedy the problem, I began to re-frame all the exterior walls from the interior. Using 2"x6"s, I built new walls directly behind each and every exterior wall. This meant that the total depth of each exterior wall was approximately 10 inches. This allowed for a great insulating factor, which resulted in very low heating and cooling costs. The windows we used where top-shelf insulated windows, which looked fantastic with the new deep wells. We lined all the ceilings with bead board, natural wood. All the trim was natural wood. We installed all new raised panel Pondarosa Pine doors. The floors where all random plank, screwed and plugged, then stained and finished. We installed a new set of stairs to the upper floor, with new rail and balusters, also stained and finished.

The kitchen was a real beauty, with recessed panel doors, and oak icebox hardware, solid brass, quite costly I might add. The crowning glory of the kitchen was the antique white enamel gas stove we found. It had two ovens, a broiler, a warmer, and six burners, and was trimmed in dark green enamel. It was a real beauty! The bathrooms where done with bead board on the lower portion of the walls. All fixtures where new, old style type, to carry out that old time look. All the door knobs where glass with brass back plates. This was truly a labor of love.

Everyone who came into this home absolutely loved it. You won't find another like it anywhere. We made separate bedrooms for the children, with their own little closets; the doors where made especially to accommodate the angles that the roof had made. This added a cozy feel for the children. This home had all new wiring, plumbing, heat/air. As you can see, we truly built a home within this home. To Be continued!!

Monday, March 9, 2009

1823 Landmark!!!


It was in the mid-1980's, when we decided to move the family away from the hustle and bustle of big city life. After quite a search for our new home, and with the help of a very kind and patient Realtor, we found our home, and it was within our budget. This particular Sunday, the phone rang, and it was our faithful realtor. She informed us that we'd better get up to this site pronto, and with cash in hand! So, we did. This soon-to-be home was in a great location, with the best schools for our children, and plenty of land for them to play and enjoy the outdoors.

This structure was built in 1823 as a church. As the parishioners grew, the building became inadequate to accommodate the growth. It was decided to move the structure and to use it as the Parrish House. This was accomplished by rolling the structure on wooden logs, just a few feet a day, till it was placed on the land that it sits on to this day. I learned all this because it was all documented in the Historic Landmark records, made available to the general public. Later, the building was sold as a private residence. There was also a Big Old Barn on this land; the barn was actually bigger than the house. Well, we sure had our work cut out for us, as we planned to transform this neglected, run-down building into our dream home.

The first thing I did was to gut the entire interior, right down to the original framing. This home was framed with chestnut timbers, and I mean timbers, right from the forest, and each piece had been hand axed to be used for its specific purpose. All joints where halved, lapped, and pegged with locust pegs, to hold them together, NO nails where used. This was how some furniture was constructed in the past. Japanese furniture makers, for example, made use of this peg construction. This wood was aged and hard as a rock. A drill refused to pass through these timbers.

Well, in the late evening I stood just about in the mid-section of this building, and as I was studying its condition and integrity, I realized that the exterior walls had tilted outwards approximately 1" to 2''. This ran along the entire length of both front and rear walls. After close observation and studying the structure carefully, I concluded that some of the intricate components tying this building together had been removed during the transporting and rolling process that I spoke about earlier. If any of you are familiar with what is called uni-body construction, then you know that each component part adds to the overall strength of its predecessor, therefore making the entire unit strong. I can't begin to express the wave of emotions that came over me, as this became more and more clear. WHAT NOW?

As a carpenter, I have learned that when you don't know just what to do, PRAY, PRAY, PRAY!! And so I did. I asked GOD to tell me, show me, help me, as to just what to do. This was a short prayer, with a swift answer. This is what the still small voice said. "Build A House Within This House." And so I did exactly that! To Be Continued!!!

Thursday, March 5, 2009

Historic Home Damaged By Hurricane! Part 4!!!


This project must have caught the attention of the local media, as one day a newsman showed up and took pictures and interviewed me. It was published in the local paper, and I hope to post the article soon. This restoration would have caused concern for any carpenter, however, I was very fortunate to have the background necessary to execute this project.


I grew up in a city where all the homes had this kind of construction and details; some, even far greater on the detail end. Many people look at a project such as this and really question whether it is worthwhile. This is understandable. You could probably build a new home on this same lot in a lot less time, and it would possibly be less costly. I never look at it like that. My first question always is, does this home still have its structural capacity and to what degree has it lost its integrity, building-wise? Most of the time, it is worth restoring, as the old time carpenters and the materials they used where far longer-lasting than those we have at our disposal today. As they say, it was a different world then, a totally different time, different values and ideas as to what is worth fixing and what should be trashed. Being a sentimentalist by nature, I try my best always to save that which is worth saving. It is quite sad in a way, how easy it is to just discard something and replace it with the new, which many times pales in comparison with the old. I guess it's just a mind set.

Well, my mind has been set and will remain set on preserving as much of the old and worthwhile as is practical and possible. This project was another great joy and blessing to all who participated. One of the biggest blessings was that I gained a friendship with a very intelligent and kind-hearted man and his wife. It was funny how all those NaySayers told me what an unreasonable person the owner of this home was, and that he was a real Meano. I sure thank God I didn't listen to their gossip!

One of the great privileges of being self-employed is you get to walk the roads and paths of your choosing; this, I will never regret. So, when I do fail or fall short, I simply look in the nearest mirror, directly at the one to blame. Well, may your next renovation project be a joy and a wonderful experience, and most importantly, money well spent. Till then... Happy Rehab!!!

Monday, March 2, 2009

Historic Home damaged by Hurricane!! Part 3!!


We used railroad ties (and I mean REAL railroad ties!) laid directly to the earth's surface, to displace the pressures we were about to apply in jacking up the two stacked porches. With reinforced header members carefully placed, and heavy duty house screw jacks placed, we were able to slowly control the lifting process. It is critical to note that all timbers have fibers, and once they get accustomed to staying in a certain position, changing that position must be a very thoughtful and careful process. If one tries to raise too much, it can cause stress and cracking, which will result in failure of the timbers to withstand the pressures and stresses that were intended to bear. A very common mistake, and a costly one I might add, is to over raise the structure to get it to perfect level. This is not what you want.

As you are lifting your loads, you must listen very closely to the sounds of the timbers; they will let you know when to stop, and you'd better listen. We did!! When we get older, things will begin to sag and settle. We can slow down the process with exercise and good diet; however, we inevitably will age noticeably. What I'm saying here is you must respect the age and conditions of the structure as a whole to do a successful rehab, restoring things in a way that will be pleasing to the eye, but not damaging to the structure. This a true restoration. In short, if you want a new house, build one. If you want an old house, restore it; work with what you have.

Well, we did. We removed all the support columns, then reworked all their damaged components, put them back where they were, and essentially reworked the entire framing and finished look of the two porches. We removed the brick support columns and aligned them as they needed to be, leveling and squaring them up in a way that made it appear that nothing had been done to them. The sign of a good restoration is, when you're done, it looks like nothing has been done. Everything looks old, but good. Thus, "an Oldie but Goodie!!" Each day we drew closer to preparing this beauty for a good paint job! To Be Continued!!

Saturday, February 28, 2009

Historic Home damaged by hurricane!! Part 2 !!!


On the day work began on the old Victorian, the owner comes out with several shopping bags, I'm wondering what can be in these bags; they looked real old. As he explained to me, shortly after the hurricane hit, he went outside and gathered as many pieces of the debris that he could. If you have ever done a puzzle, you would know the type of pieces I'm referring to. I explained to him that these pieces simply wouldn't help. He said, "How do you plan on reproducing all the fancy scroll work that was mounted on top of the massive cable ends of this home?" This was an excellent question, seeing that these bags he had saved all these years seem to contain the only evidence of what the scroll work looked like.


However, age and time had left a silhouette on the large boards that this fancy work was mounted to. I used large sheets of clear plastic and push pins to hold the plastic onto the backing surface, which enabled me to trace an exact copy of what once was. I then cut the tracing out, making a stencil, which was later used to reproduce the scroll design. This was then mounted on the backing board, and Bingo, we had the old look back!!

Needless to say, the owner was quite happy, so he called the local newspaper. They came out and took pictures, and posted an article about this Historic Landmark. I hope to post that article, and pictures which I think will clearly show exactly what I'm referring to, as to the details of restoration.

This part of the project was just one segment of the challenges that awaited the home's restoration. Next, we needed to deal with structural issues, as the two stacked, open porches had severely gone out from their once level positions, and had sunk and racked out of alignment. How would we get them back in order, without causing further damage? More importantly... without them coming down to the ground in the process. To Be Continued!!

Friday, February 27, 2009

Historic Home damaged by hurricane!! Part 1!!!


In the 80's, I moved to a small city in Central Florida. One day, while driving down Main St., I noticed this very old, beautiful Victorian home. It was obviously damaged and missing the Ginger Bread trim, as it is called, which is the crowning glory of all authentic Victorians. This is one of the real workmanship components on an older home.

As I passed by, I told my children, who were in the car with me, that someday I would love to restore that home. As they say, be careful what you wish for, because you just might get your wish. And so I did. I got to meet with the owners, an elderly couple, who were two wonderful people. The gentlemen was a retired surveying engineer, and very concerned with the structural integrity of the home, as it had settled and visibly caved in in some areas. He stated that he waited for many years for me to arrive, almost knowing I was the man for the job, although we had not met before. Well, we stuck up quite a relationship over time, and he asked many questions of me about how I would do this project. Finally, he asked me to draw what I perceived to be the method and approach to re-stabilize his home.


Drawing is not my long suit; however, I fulfilled his wishes. Much to my surprise and delight, he was quite impressed with my drawing, which I still have to this day. After bartering price and cost, we agreed, and work began. Being a surveyor, he insisted on my wearing a hard hat; mine was orange, and his was white. (White hard hats are worn by the supervisors, orange by the workers. That's me.) I went along with most of his wishes, since he reminded me a lot of my Dad. They have their ways, but they know how to conduct a job, so I respected this.


By the way, as you might have read, I've been doing this for more than 35 years now, and generally don’t allow others to direct me in those areas that I excel at; however, there are exceptions to every rule, and this was one. To Be Continued!

Thursday, February 26, 2009

Don't play with matches!!! Part 4


Once the home was well dried out from all the water, I began the restoration. As you can see in the pictures, the original attic had four Dutch dormers, as they are called, one on each side of the hip styled roof structure. I had to decide whether to retain the hip style or replace it with a full dormer with an A-frame type pitch.

Again, if you look at the pictures, you'll see that I went with the A-Frame type. The reason for this was to gain the full space of the attic, to be used as living space. The Dutch dormers look nicer from the exterior; however, they cut the interior space up in a way that doesn't allow for full use of the area. I also decided to add a full kitchen and bath; before the fire, this space was just used as a bedroom. Part of my reasoning for these decisions was that I intended to make rental units on each floor. Since the total area of the home after restoration was over 4500 sq. ft., it would have been difficult to find a renter who wanted or needed that much space. Turning the house into three large apartments of1500 sq. ft. (each the size of a modest single-family home) seemed to be a better option. I did this, and was able to generate a pretty good rental income.

This renovation took approximately seven to eight months to complete, a big part of which was waiting for everything to dry out. I must say that, while it is a huge undertaking to restore a fire project of this magnitude, the hard work always comes back to you through the great rewards and satisfaction of finishing the job.

The original owners showed up one day about a year later, and with tears in their eyes, they said, “Thank you, Bill, for putting our wonderful house back together”.

I thanked them back for the blessings that abounded because of it!

Wednesday, February 25, 2009

Don't play with matches!! Part 3 !!!


After handing my business card to the owners and offering to help with the insurance process, I proceeded to help some tenants transport their belongings elsewhere. A short while later, the owners asked me to give them an estimate on protecting the home temporarily while the insurance people did their thing. This process can take time! The entire top of this home was now gone and exposed to the elements. I furnished them with two estimates, one for a temporary flat deck, and the other for an A-frame pitch type deck. I advised them that, in light of how long this home might sit, I would go with the A-frame type, even though it was a more expensive option. They did not want to spend the extra dollars on the A-Frame type, so I offered it at the same cost as the flat type, knowing there had already been enough damage done to this structure, and it was time for it to start drying. Needless to say they gratefully accepted my offer... and so we protected this beauty!

A few days later, I came home to find the owners in my living room. Well, to make a long story shorter, they asked me if I would consider buying their home, telling me that they were too old to deal with such a large renovation and wanted to move to California to be with their son. They made me an offer that could not be refused. This was a once in a life time deal!!! Kindness and generosity surely paid off, and so I bought the home and began the restoration.

Anyone who has ever worked on a fire job will tell you that you can't have enough clothes to finish the job, as they are trash until you get past the removal of all the charred timbers and debris. This was correct in this fire job, as well. We proceeded to completely remove all signs of fire damage. This is a tedious but very necessary process, which cannot and should not be overlooked or rushed. You can never get rid of the smokey smell from a fire without being thorough during this critical process. You need to allow time to let the space heaters do their job. The house needs plenty of heat and plenty of fresh air.

I will conclude the story very soon. See you then.

Tuesday, February 24, 2009

Don't play with matches! Part 2


The question is, why did the blaze rekindle? The answer is that during the period of construction in which the home was built, the exterior walls were framed by a method known as balloon construction. This simply means that the cavity between the 2x4 walls ran clear up from basement to attic, creating a draft much like the way a chimney works. If an ember remained inside this cavity where we have balloon construction, it could re-kindle, and the blaze could become very aggressive. This is what happened to this beautiful 1920's Classic. Today's construction differs in that each floor is stacked on a separate deck with wood plates separating each floor, thus acting as a fire stop.

The entire attic of the old house was lost to the blaze. Extreme water damage was incurred in order to extinguish the fire, causing severe damage to the rest of the structure. It has been said that, most times, the damage caused by the water far exceeds the fire damage. This was the case here. Now, the question that I had to ask myself was, could this classic be rehabbed and was it worth the effort and cost?

My conclusion, definitely YES!!!I will post more in the next blog.

Have a home improvment question?

If you would like me to post a blog on a specific question that you have, please send an email to skilcarp@yahoo.com

Also, I would be happy to answer privately if that would make you more comfortable.

See you in the next blog!

We would also be happy to help you with your home improvment needs in the Orlando Central Florida area and in Sarasota.

Monday, February 23, 2009

Don't play with matches! Part 1


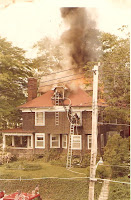
Sometime in the mid 80's, while living in NY, I returned home from work, only to see the beautiful home across from my own in the early stages of destruction. A young boy, playing in the attic with matches, set a blaze to a charming home that had been built in the 1920's. Those were the days of true workmanship and pride, a time when things were built for practicality and endurance. The workmanship on this home was absolutely magnificent, inside and out. It had features you don't find in today's homes. It was a true classic.

Well, as things heated up, the fire grew so intense that the roof shingles melted into a tar liquid that began dripping off the roof edges and down the gutters. As it turned out, the Fire Department had to make two trips to extinguish this fire. The first time, they thought the blaze was out, but it reignited a short while later.

Welcome to my Blog!

I have been a carpenter for 35 years. It's hard to believe. I am one of the few lucky people that really do what they love for a living. In the '80's, I would buy historical homes that were usually in horrible condition and restore them back to pristine condition. These were always my favorite projects.

Many people feel that they can restore a home on their own, and this is true for some houses, but the older ones have so much more to them. The key is to restore to the way they would have looked in their prime. Nothing sickens me more then seeing a house that was so full of beauty from the 1800's or 1900's that has been made to look modern inside. It just doesn't fit. I specialize in older homes and homes that have been through a fire. A lot of times, people think there is no hope for homes that have been through a fire, but that isn't always the case.

In some of the following posts, I will show a few examples of homes I have restored. Please feel free to ask my advice if you have a home that is in need of extensive repair. That is one of the reasons that I created The Handi Craftsman Home Improvement Blog. Whether you are in Orlando, Sarasota, Central Florida, or anywhere else, I will do my best to answer your questions.

See you in the next blog!

Monday, February 16, 2009

Ask for references!

I can't tell you how many times I have met someone who hired a contractor to work on their home, where the contractor started work, but never showed up again. There is a good reason why this happens. He is unreliable. Obvious answer, right?

Yes it is, but you would be surprised how many people do not bother to ask for (and take the time to call) references. If you decide to hire a contractor, ask them how long they have been in the area and to give you three references from their most recent jobs. Then call the numbers they provide you and, if possible, drive by and see what they did.

This takes a little bit of leg work, but it could end up saving you an arm.. and a leg!